It has been said, “first impressions matter.” Learn How To Photograph 2D Artwork so you can make the best first impression possible.
Taking quality photographs of your 2-dimensional artwork is a vital and relatively easy skill to acquire. With the invention of smartphones, you have a camera and editing software in your hands. The cameras on smartphones are high quality enough to take digital images of your work. Then you can use that picture for exhibit applications, adjudication processes, social media, or websites. When you send pictures of your artwork, you want it to be as close to the original as possible.
Understanding a few key components of lighting and how to use the camera more efficiently will make your artwork shine.
How To Photograph 2D Artwork – Transcript:
This tutorial was created to help you photograph your artwork at home with a smartphone or tablet.
There are a few things you will need: tape, clips, a lens cloth, and a smartphone or tablet.
Because our cameras are now our phones, the lenses are often dirty from being taken out of pockets, purses, and bags. Please clean the lens first.
Indirect natural light is the best for having accurate colors and values in your photographs. Set up a surface near a window that has even lighting to take your photos.
Curled edges will appear out of focus. Use tape or clips to keep the work flat while you are photographing it.
To avoid glare in your photographs, turn off the flash. Then look for the timer-mode and set it for 3 seconds. It will help you from getting a blurry photograph.
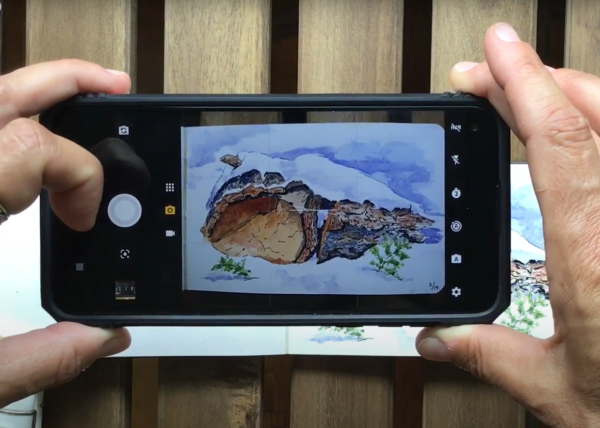
Now that you are ready to take a photograph, physically move the camera so that the image fills the screen, rather than using the zoom setting. Zoom tends to reduce the quality of the image. Next, make sure that the edges of the artwork are square to the screen. You should not see any angled or slanted edges on the artwork. Once your image fills the screen, and the edges are square, you are ready to take a photograph. The 3-second timer allows you to hold it still without jittering it when you go to push the shutter button.
Some images have an empty negative space in the middle, which is difficult to focus on. That may require you to touch the screen on a part of the image that the camera can focus on. Once you’ve selected that part, it will focus easily. At this point, you can also adjust the lighting to lighter or darker if you desire. It’s always good to take a couple of images.
When working with larger artworks you may need to go outside in indirect light. Or work in the shadow of a building if you need to. Drawing boards, clips, and tape will help keep things secure while you work. Take photographs before you frame them. It is almost impossible to eliminate reflections from the glass and these are difficult to edit out.
If the artwork is not hanging on a wall, check to be sure that the artwork and the camera are parallel to each other. This will help keep the image square, maintain good focus across the image, and reduce the chance of glare.
You are ready to take photographs. To review:
- Work in indirect/diffused light indoors and outdoors.
- Keep the work flat and secure.
- Avoid glare by turning off the flash.
- Use a 3-sec timer to reduce blur.
- Fill the screen with the image.
- Keep the edges square.
- Lastly, don’t photograph through glass.
You are ready to take photos. Best of luck!